Updated: April 29, 2009
Virtualization is an excellent way of testing and debugging software, running multiple instances of different operating systems on the same desktop simultaneously, minimizing hardware costs, and increasing modularity and efficiency. It allows power users to save time and money and perform tasks that they would not normally dare, try or even be able to. Virtualization, as the name implies, is about using virtual machines. These virtual machines are stored on virtual hard disks.
The problem is that each virtualization product offers its own filesystem format. This means that if you're using, for instance, VirtualBox and VMware, the two programs will create virtual machines - and virtual hard disks - in their own separate ways, not necessarily mutually compatible. So, does this mean that you might have to reinstall your operating systems several times, once for each virtualization product you use. The answer is: not necessarily.
The world of virtualization offers quite a bit of flexibility when it comes to importing, exporting and converting virtual machines from their native format into other formats. This is what this article and its several sequels are all about: show you how you can quickly and easily convert virtual machines. Today, we will introduce VMware Converter, a powerful VMware utility that allows you to manipulate VMware virtual machines in many ways, including even converting physical machines to virtual ones and vice versa!

Conversion process
We will convert ESX & ESXi persistent virtual hard disks (flat vmdk) into VMware Player, Server and Workstation virtual hard disks. Let's say you have an ESX (or an ESXi) server, where you keep some of your virtual machines. And let's say you want to use these machines in VMware Server or maybe VMware Workstation. You can't.
Even though both ESX and other products are all made by VMware, there are some differences between them to prevent you from using the virtual machines on the fly. You will have to convert them. This is where VMware Converter comes into play.
For more information about virtualization in general, please refer to my Virtualization section. More specifically, you will find the following articles of interest:
How to clone virtual machines in VMware Server
How to clone virtual machines in ESXi
We will take a 20GB pre-allocated, non-shrinkable virtual hard disk located on an ESXi hypervisor, which consists of the header file (name.vmdk) and a flat file (name-flat.vmdk) and convert it into a growable virtual hard disk (something.vmdk) fully usable by VMware Player, Server or Workstation. In the process, the pre-allocated free space will be "freed" - thus making our image significantly smaller.
First, download and install the Converter. You will have to register for download. Once the Converter is installed, run it. VMware Converter runs both on Windows and Linux. The demonstration screenshots throughout this article have been made on a Windows machine, but for the sake of convenience, there's also a pair of screenshots from an openSUSE 11.0 installation toward the end.
Step 1: Specify Source
The Convert supports numerous conversion options. I'm going to show you a few:
Powered-on machine:
This is an actual running host, either local or remote. The supported operating systems include a variety of Windows versions, RedHat, SUSE Ubuntu.

VMware Infrastructure virtual machine
Supported products include ESX server, ESXi and vCenter Server.

VMware Workstation or other VMware virtual machines
This option will most likely be one of your more frequent candidates, either as a source or a destination. As you can see, the entire family of VMware desktop products is supported, from Player up to Workstation.

Backup image or third-party virtual machine
Here, you will find a range of non-VMware products. Microsoft Virtual PC and Parallels are supported. Unfortunately, I did not find VirtualBox. But worry not, we'll talk about VirtualBox-VMware conversion in a separate article.
Some of you may also like the fact Acronis True Image backups are also supported. So if you're using ATI to image your system, here you have a fantastic option of trying out the image in a virtual machine. The same applies for ShadowProtect.

Virtual Appliance
The last option refers to preconfigured virtual machines.

We will use VMware Infrastructure virtual machine as our source.

After connecting to our ESXi server, we can see a list of virtual machines available for conversion.

Step 2: Specify Destination
Like before, we have five options. We'll choose the destination type to be VMware Workstation or other VMware virtual machine. Under Select VMware product, choose the relevant one. Since I'm using VMware Server 1.x, this will be my choice. Lastly choose the name and the directory where you want to save the converted virtual machine.

Step 3: View/Edit Options
After you have made your choice, you will see what kind of virtual machine the Converter is going to make for you, in addition to converting the hard disk. Notice the warning sign. You can ignore it now, if you want, but make sure you review the virtual machine options after it is converted and before you run it for the first time on its target platform.
For instance, my ESXi machine had too much RAM - more than total memory on my laptop. So I had to trim down and adjust. Another general warning refers to multiple CPU and hyperthreading.

Another option worth reviewing is the hard disk (under Data to copy). You can create a pre-allocated target disk and optionally split it into 2GB files or create a dynamically expandable disk and optionally split it into 2GB files.
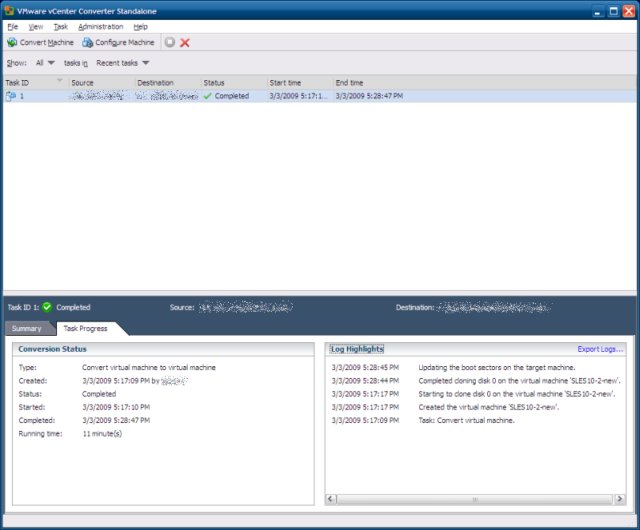
Step 4: Conversion in process
After you review the options above, the conversion will begin. Depending on your processor and network, it will take some time. In my case, 11 minutes to convert a 20GB disk into a 3.3GB disk.

Step 5: Test
Ah, yes. Power the machine in its intended new format, to make sure the conversion worked without problems. And that's it! Very simple, isn't it?
Important note
We have already seen how to clone virtual machines, on Server and ESXi, separately. But the copy / paste method will not work if we want to clone from Server to ESXi and the other way around. Using the Converter, we can overcome the problem:
Situation 1: Clone from Server to ESXi
Create as many instances of the virtual hard disk locally, by using the copy & paste method mentioned in the original article. Then, convert the virtual machines and upload them to ESXi. Alternatively, copy only one machine and clone it using the ESXi method.
Situation 2: Clone from ESXi to Server
The same as above, in the reverse direction. Either create several copies, then convert and download them, or create one machine, convert it, and once it is located on the local disk, use the copy & paste method to create several.
Linux screenshots
As promised, here's a pair of screenshots of VMware Converter installed on openSUSE 11.0, running KDE. The menus and options are identical, so you won't have any trouble applying the lessons learned from the "Windows" section above onto the Linux case.


Conclusion
VMware Converter is a very friendly, very powerful tool. It allows you a great degree of freedom when it comes to planning your virtualization deployment. You need not worry much about how rigid or flexible your setup will be, hard disk requirements across multiple platforms, incompatibility of formats etc; instead, you can focus on getting job done, leaving the hard work to the Converter.
In the next article, we will talk about converting VMware hard disks (vmdk) to Amazon Elastic Cloud Computing (EC2) format AMI. In the second sequel after that, we will talk about VirtualBox and VMware.
Cheers!